Resin 3D Printing for Beginners
Resin 3D Printing for Beginners: The "No-Nonsense" Guide to Your First Masterpiece

Quick Take: The Resin 3D Printing Workflow
If you’re looking for the short version, here is the systematic path from liquid to legend:
- Preparation: Orient your STL and add supports in a slicer.
- Calibration: Dial in your exposure settings for your specific resin.
- Printing: Let the machine do the heavy lifting in a temperature-controlled room.
- Post-processing: Wash off excess resin and cure the model under UV light.
- Finishing: Carefully remove supports and sand any remaining nubs.
You’re standing over your printer, nitrile gloves on, the smell of isopropyl alcohol stinging your nose. You open your printer, praying to the hobby gods that there’s actually a miniature on that build plate. But when you take a closer look… nothing. Just a flat “pancake” of cured resin stuck to the bottom of the vat. It’s frustrating. It’s messy. And honestly, it makes you want to throw the whole machine out the window.
We’ve all been there. Resin 3D printing looks like dark magic—until you realize it’s just a system. Once you understand how the pieces fit together, the “guessing” stops and the “printing” actually starts. At Loot Studios, we’ve gone through hundreds of gallons of resin and hundreds of failed prints to figure out that system so you don’t have to.
If you want to see this workflow in action before we dive into the details, this video breaks it down clearly:
What is resin 3D printing?
Resin 3D printing (SLA/MSLA) uses a UV light source to selectively harden layers of liquid photopolymer resin. Unlike FDM (filament) printing, resin allows for incredible detail and smooth surfaces, making it the industry standard for high-quality tabletop miniatures and complex statues.
Think of it like stacking ultra-thin layers of hardened liquid. Instead of a nozzle drawing lines, an LCD screen flashes a whole “slice” of your model at once. It’s faster, it’s sharper, and once you see the results, you’ll never go back to chunky layer lines again.
How does a resin 3D printer work?
A resin 3D printer works by lowering a build plate into a vat filled with liquid resin. An LCD screen or laser projects a specific shape of UV light through a transparent film (FEP), curing a single thin layer of resin at a time. This process repeats, stacking thousands of layers to form a solid model.
But here’s the catch: if the bond between the resin and the build plate is weaker than the bond between the resin and the FEP film, your print stays in the vat. That’s where most people lose their minds.
The Real Workflow: Step-by-Step
1. Preparation
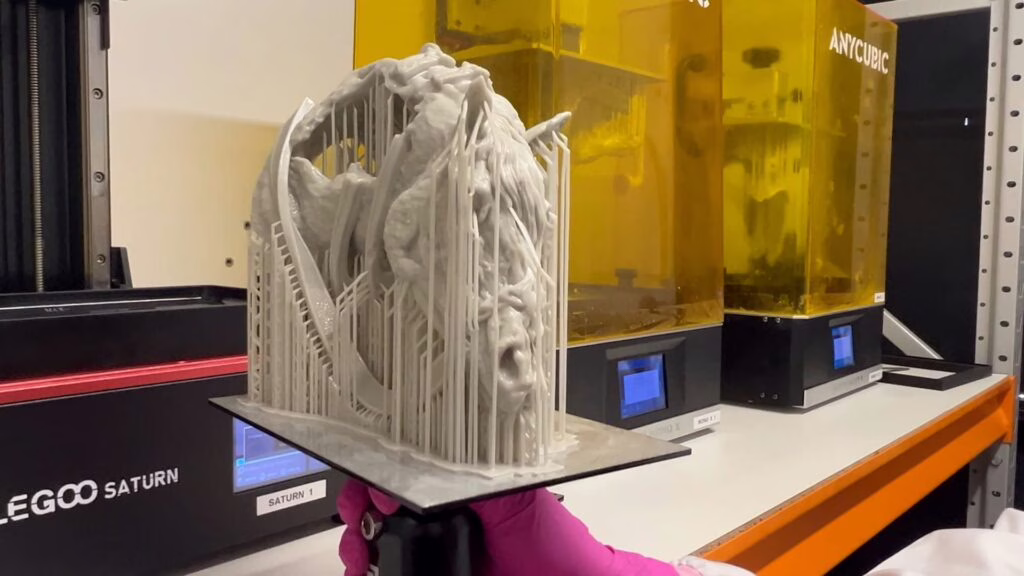
This is where the battle is won or lost. You take your free STL miniatures from Loot Studios and drop them into a slicer. You have to think about gravity. Angle your model to reduce suction and add supports. If you use poor supports, the weight of the model will tear it off mid-print. That’s why all, and I mean ALL of our minis come pre-supported. You just have to slice them, press print, and voilá – a masterpiece is born!
2. Calibration
Nobody tells you this, but every resin is different. “Standard Grey” from one brand isn’t the same as “Standard Grey” from another. You have to find your “exposure time”—the exact amount of seconds the UV light needs to flash to harden the resin without over-curing it.
This is where most people fail without even noticing. They use the “default” settings and wonder why their minis look like melted candles or snap like crackers.
Now, if you’re tired of wasting resin on “test” prints that fail, you should check out our 3D Printing Hero course. We give you the exact calibration files and the “Cones of Calibration” method we use at Loot Studios to get perfect results on any machine.
3. Printing
Shake your resin (seriously, do it), pour it in, and make sure your room is warm. Resin hates the cold. If your garage is 50°F, your prints will fail. You need a consistent environment to get a consistent result.
4. Post-processing & Safety
Now the “dirty” part. You need PPE—gloves and a mask are mandatory. You wash the model in Isopropyl Alcohol (IPA) to get the sticky residue off, then you cure it under a UV lamp to fully harden the plastic.
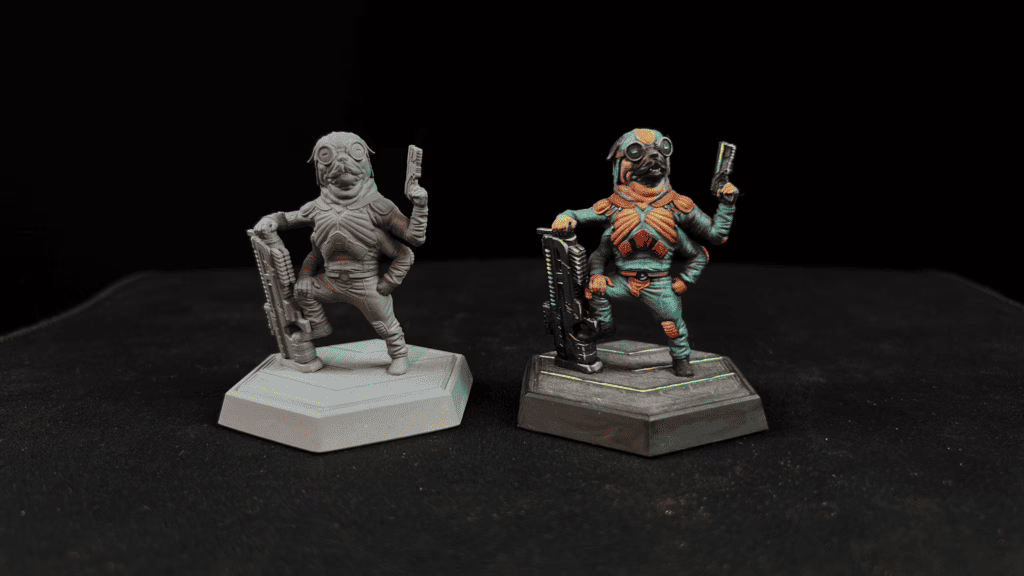
5. Finishing
This is the most satisfying part. Snip away the supports. If you did it right, they’ll pop off like dry twigs. A little sanding here and there, a coat of primer, and that hunk of liquid is now a hero ready for the table.
Check here how we do the finishing process at Loot Studios:
Why Do People Fail?
Most failures aren’t random—they’re predictable. If you’re seeing failed prints, it’s usually one of these “Big Four” killers:
- No Calibration: Using “default” exposure times.
- Bad Leveling: If your build plate isn’t perfectly flat, the first layer won’t stick.
- Wrong Temperature: Printing in a cold room (anything under 70°F is risky).
- Broken Workflow: Skipping steps or getting lazy with cleaning.
If you want to see exactly how these mistakes look (and how to fix them), this video is a lifesaver:
It’s Time To Become a Hero!
There’s a specific second in this hobby where it stops feeling like you’re gambling with a $300 machine and starts feeling like you have a superpower. It’s the moment you stop guessing and start following a system. Understanding leads to clarity, and clarity leads to repeatability.
This is exactly why we built 3D Printing Hero.
At Loot Studios, we aren’t just theorists. We are in the trenches, testing thousands of files across every machine from the best resin printers to the cheap entry-level ones. We realized that most “tutorials” were either too technical or too vague.
And that’s why we wanted to create a mentor—a step-by-step guide that takes you from “I just unboxed this” to “I’m printing pro-level minis.” We’ll teach you how we do things here at Loot Studios. And the best part? It is completely FREE.
CLAIM YOUR HERO STATUS!
You don’t have to keep cleaning “pancakes” off your FEP. Not even have to wonder why your supports are failing. You just need a better map for the adventure.
If you’re ready to stop guessing and start creating the worlds you’ve always imagined, join us. Grab your free STL miniatures to test your skills, and then enroll in 3D Printing Hero. We’ve already cleared the path; you just have to take the first step.
Come learn from one of the best, and become a hero with us!
Loot Studios can help you paint highly detailed minis, statues, terrains, and props. Choose your favorite bundle from our previous releases or sign up for Fantasy or Sci-Fi to receive a new bundle every month. You can also check out some tips on our YouTube Channel.

Robert, also known as Rob, is an artist, English teacher, and lifelong RPG enthusiast. When he’s not sketching worlds or guiding learners through language, he’s diving into dice-rolling adventures and uncovering the magic that makes tabletop storytelling unforgettable. Fuelled by imagination and curiosity, Rob has spent years immersed in the RPG community, studying its stories, creatures, and creativity. He currently works in the marketing department at Loot Studios, where his passion for fantasy, minis, and the RPG universe fuels everything he does. Always with one foot in the real world and one in the realms of adventure, Rob celebrates art, language, and the joy of bringing ideas to life, whether at the table, in class, or behind the scenes.