Don’t Blame Your Camera for Bad Miniature Photography
Here’s how to fix your pics!
If you’ve ever spent dozens of hours painting a stunning miniature, only to take a bad picture, you know the frustration. You might be blaming your smartphone or that old DSLR camera. But here’s the truth that will change everything: Your miniature photos look bad, and it’s probably not your camera’s fault.
The biggest issue in miniature figure photography isn’t megapixels or expensive lenses. It’s light, distance, and composition. With a few simple tricks, you can make your minis look like the heroes they are meant to be. So, we created this miniature photography tutorial to guide you through everything you need, from using natural light to creating cinematic setups at home.
Think of it this way: You wouldn’t paint a masterpiece in a dark room with a single candle. The same logic applies to photography. You don’t need a professional studio; you just need to understand a few fundamentals. Let’s dive in and fix those photos for good.
Here’s what we are going to talk about!
- Lighting matters more than gear
- Distance affects focus
- Background controls attention
- Simple setups beat expensive equipment
Why Miniature Photos Look Bad
Most people point their camera at anything and expect magic. It makes sense, as we are used to smartphones that promise us the perfect photo and all videos in 4k. And as a person that works with marketing, let me tell you: it is marketing. I know, 50 megapixels is an excellent tool to be great at taking pictures. Nonetheless, it is still a tool.
But we’re here to fix your problem! So, basically, when you take your pics and they get dark shadows, blurry details, and colors that look nothing like what’s on their desk, the culprit is usually one of three things:
- Bad Light: Using the camera’s flash or a single overhead room light creates harsh, unflattering shadows.
- Too Close: Getting too close with your camera (especially a phone) prevents it from focusing, resulting in a blurry image.
- Busy Background: A cluttered desk or a messy room distracts the eye from your beautiful paint job.
Lucky you, all three of these problems are incredibly easy to solve. You don’t need a degree in photography, just a few smart adjustments. A great first step to seeing your minis clearly is having the right light while you paint. If you’re still setting up your hobby space, check out our guide on the best desk lamps for painting miniatures in 2026 to ensure you’re starting with a well-lit masterpiece.
Using Natural Light for Miniature Photography
Before you buy any gear, look out your window. Natural light is free, abundant, and one of the most flattering light sources for miniature photography. Here’s how to use it effectively:
- The Golden Rule: Never shoot in direct sunlight. It creates harsh, high-contrast shadows that will wash out your details.
- Find the Soft Light: We call soft light the type of light that doesn’t produce much shadow, like a clouded day, for example. You’ll notice that there aren’t prominent shadows on a cloudy day. Hence, soft light. Now, place your miniature near a window on a cloudy day, or position it so the window light is indirect. This soft, diffused light wraps around the model beautifully.
- Use a Reflector: You don’t need a fancy store-bought one. A simple piece of white paper or foam core placed on the shadow side of your mini will bounce light back in, filling in those dark areas and revealing all your hard work.
This simple setup—a window and a piece of white paper—can produce better results than most cheap artificial lights. It’s the perfect starting point for anyone just getting into miniature figure photography.
Simple Lighting Setup for Miniatures
Don’t have a good window? No problem. You can build a simple, effective lighting setup with things you probably already have at home. The goal is to control the light, which is the single most important element of any miniature photography tutorial.
Here’s a “desktop studio” you can assemble in minutes:
- The Light: A simple desk lamp (like an IKEA Tertial) with a bright LED bulb. Ideally, look for a bulb with a high CRI (Color Rendering Index) to ensure your colors are accurate. Aim for 5000K-5500K to mimic daylight.
- The Diffuser: Bare bulbs are too harsh. You need to soften the light. You can clip a piece of white baking paper or a thin white cloth in front of the lamp. This acts as a cheap, effective softbox.
- The Background: A piece of white or black poster board curved into a smooth “sweep” creates a seamless, professional-looking background. It eliminates distracting lines and puts all the focus on your miniature.
Place your mini on the sweep, position your diffused light at a 45-degree angle from the front/side, and you’re already 90% of the way to a great photo.
Full Lighting Setup: Key Light, Rim Light, Fill Light
If you want to take your photos to the next level and create dramatic, professional-looking images, you’ll want to move to a three-point lighting setup. This is a standard technique in photography and film, and it works wonders for miniature photography.
- Key Light: This is your main light. Place it at a 45-degree angle to one side of your miniature, slightly above it. This creates the primary illumination and establishes the mood.
- Fill Light: Place a second light (or a simple white reflector) on the opposite side of the key light. Its job is to “fill in” the harsh shadows created by the key light, revealing detail without creating its own shadows. It should be less bright than the key light.
- Rim Light (Back Light): This is the secret sauce. Place a light behind your miniature, pointing towards it from a high angle. This creates a bright outline or “rim” around the edges of the figure, separating it from the background and adding incredible depth and a 3D pop.
You can achieve this with three simple LED lamps. It sounds complex, but once you see the effect, you’ll never go back. This setup truly makes your miniatures look like they belong in a fantasy film.
Camera Settings: Smartphone vs. Professional Camera
Now let’s talk about the gear in your hands. Whether you’re using the latest smartphone (and we are not debating Android x iOS, ok? Ok.), or a semi-professional DSLR, understanding a few key settings will dramatically improve your miniature photography.
For Smartphone Users:
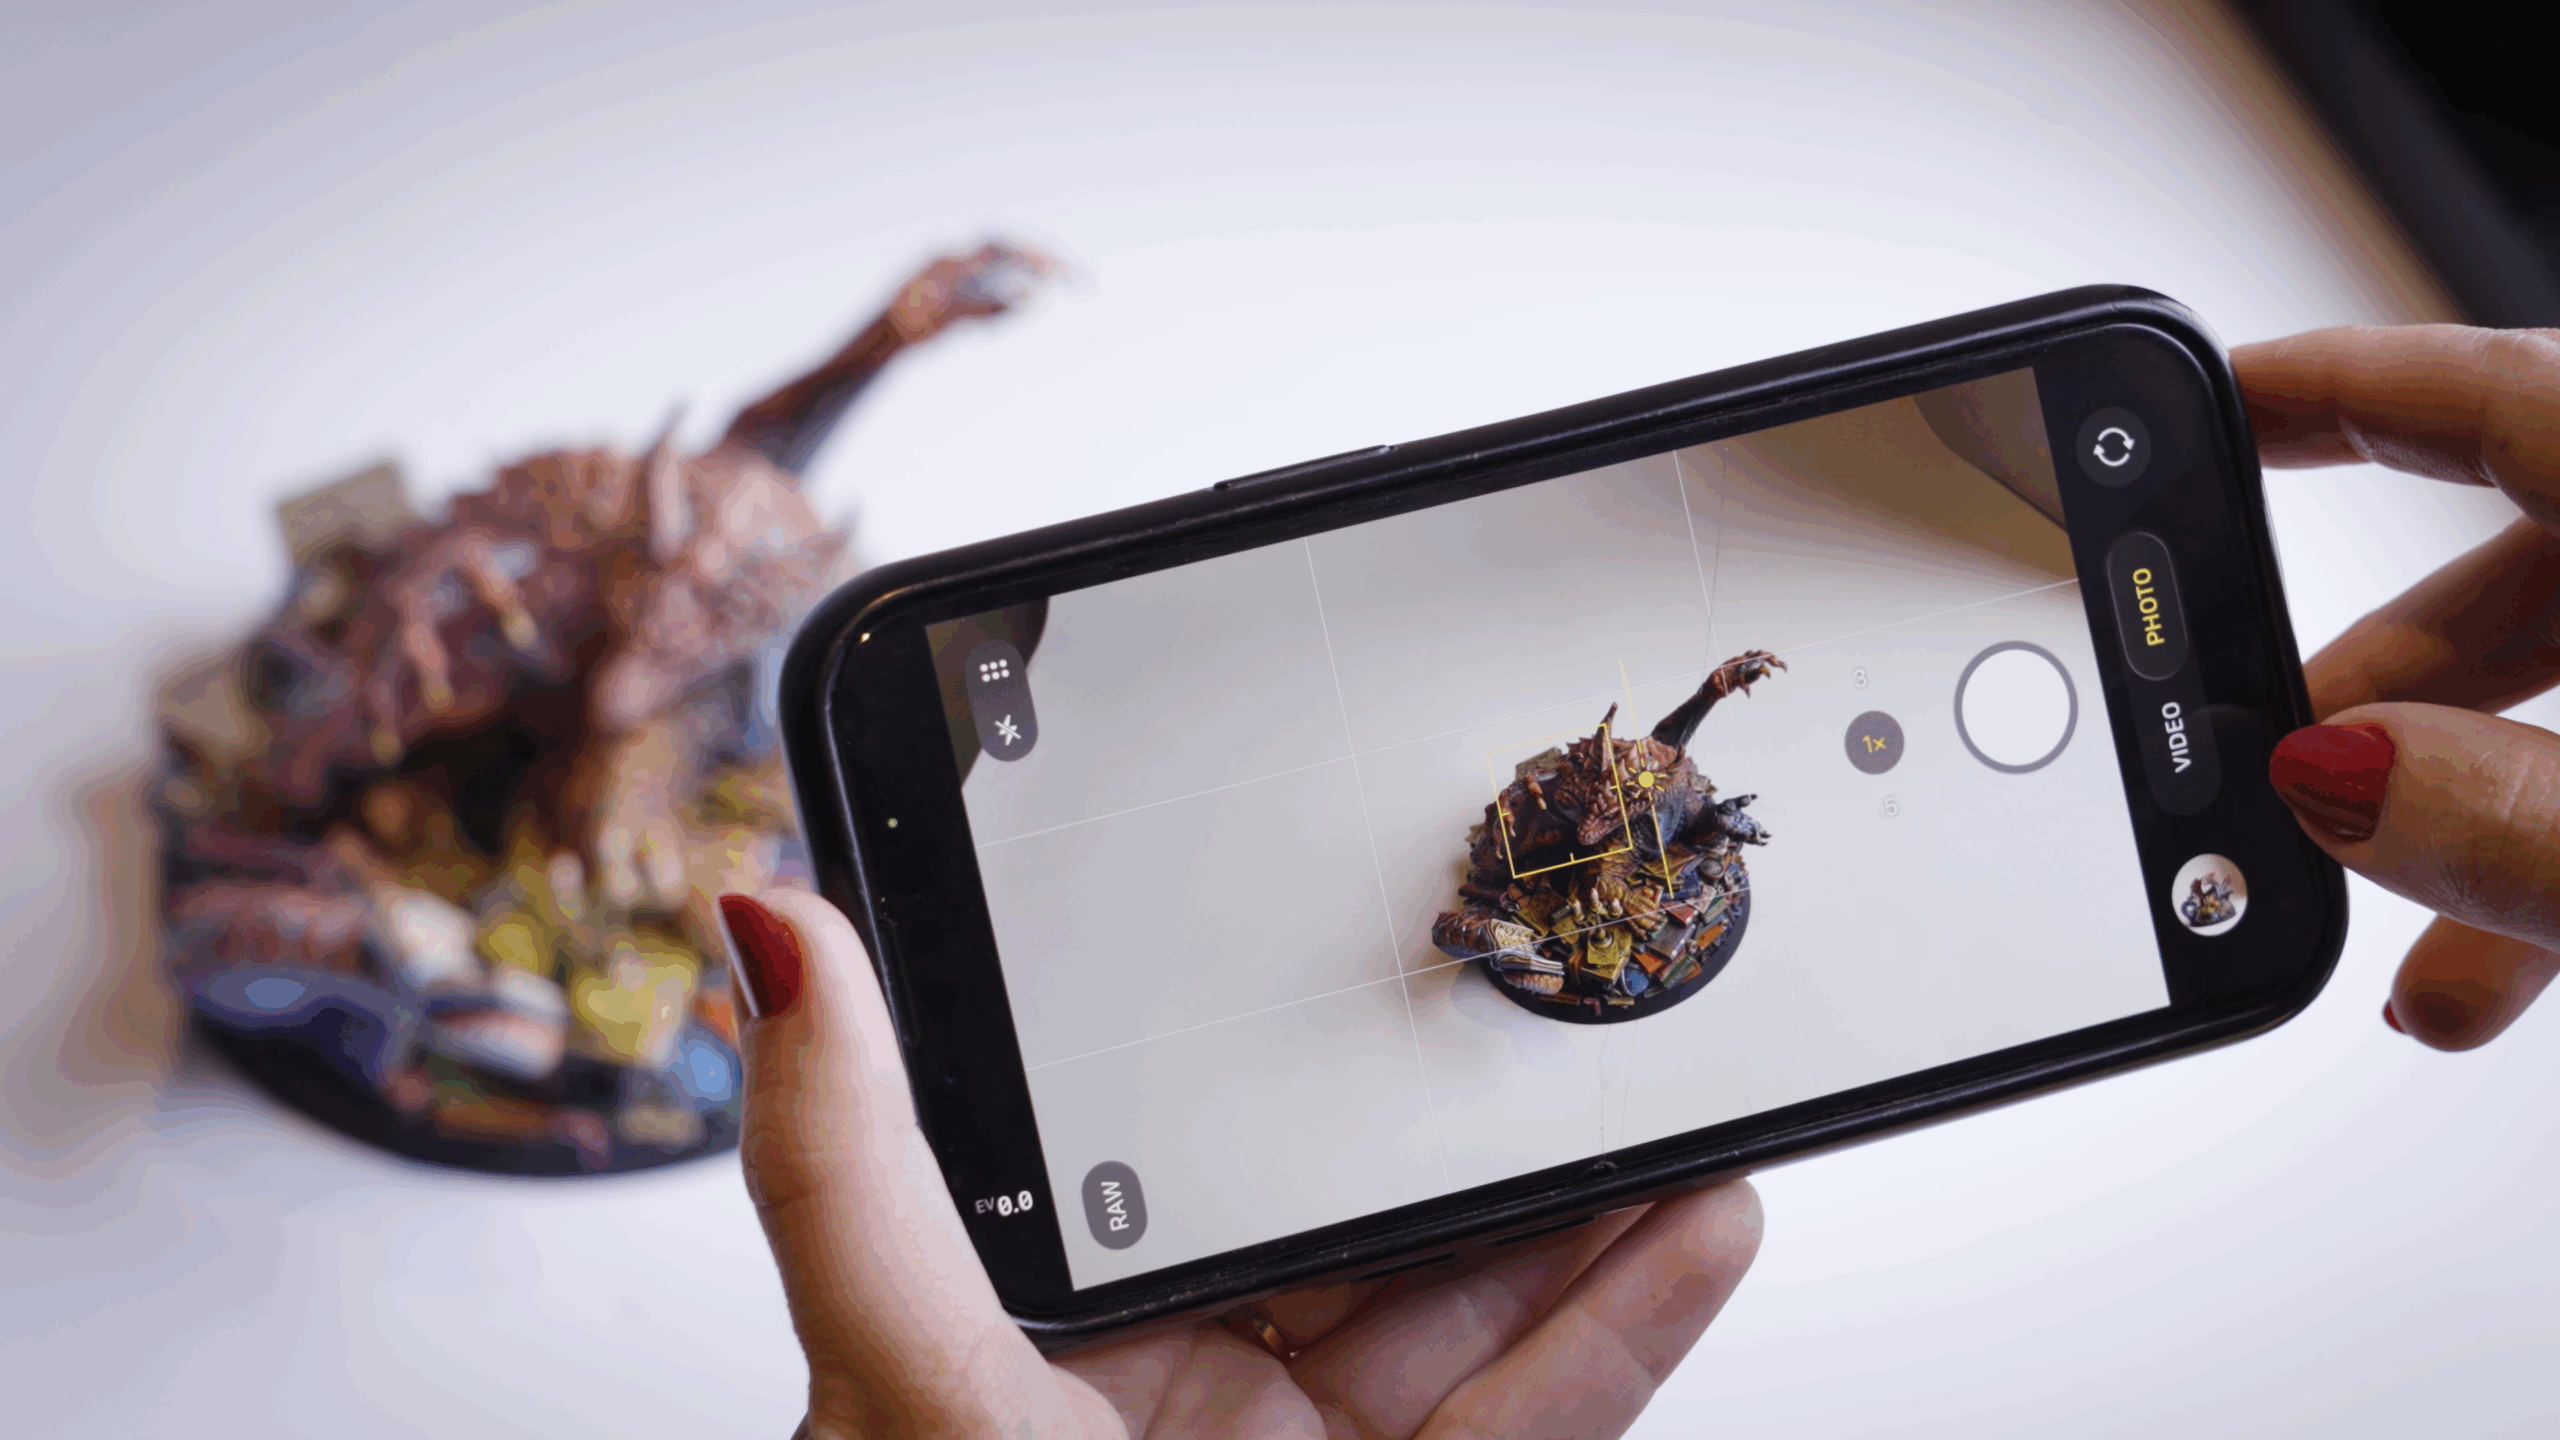
- Tap to Focus: Always tap on your miniature on the screen to tell the camera where to focus. This also adjusts the exposure for that area.
- Use Portrait Mode: If your phone has it, portrait mode can create a lovely blurred background (bokeh) that makes your mini stand out. Just be careful with complex shapes—the software can sometimes blur parts of your miniature by mistake.
- Lock Exposure: On most phones, you can tap and hold on the screen to lock both focus and exposure. This is useful if you’re repositioning the mini and don’t want the camera constantly readjusting.
- Never Use Digital Zoom: Digital zoom just blows up the pixels and makes your photo grainy. Instead, physically move the camera closer or take the photo and crop it later.
- Shoot in Natural Light: Remember our window setup? Your phone’s small sensor loves natural light. Use it!
For DSLR and Mirrorless Users:
If you have a semi-professional or professional camera, you have more control. Here’s what to focus on:
- Aperture Priority Mode (Av or A): This is your best friend. Set your aperture to a higher f-stop number, like f/8 or f/11. This increases your “depth of field,” meaning more of your miniature will be in focus from front to back. A wide aperture (like f/2.8) will make part of your mini blurry, which is usually not what you want in product-style miniature shots.
- ISO: Keep this as low as possible—ISO 100 is ideal. Lower ISO means less grain (noise) and cleaner images. Since you’ll be using good lighting (from our setups above), you can afford to keep the ISO low.
- Shutter Speed: Your camera will automatically adjust this in aperture priority mode. If you’re using a tripod, shutter speed doesn’t matter as much because the camera is stable.
- White Balance: Set this to “Daylight” or around 5500K if you’re using daylight-balanced lamps. This ensures your whites are truly white and your reds look red, not orange.
- Use a tripod (or anything that stabilizes your camera): This is non-negotiable for sharp, professional results. A cheap tabletop tripod works perfectly for miniatures. It eliminates camera shake and lets you fine-tune your composition.
- Remote Shutter or Self-Timer: Even pressing the shutter button can cause slight movement. Use a remote trigger or your camera’s 2-second self-timer to take the shot hands-free.

Creating Cinematic Miniature Photos
Now that we’ve set the lighting, we can go wild!
Lighting sets the stage, but composition tells the story. Think of your miniature as the star of a movie scene. Here’s what you’ll do:
- The Rule of Thirds: Imagine a tic-tac-toe grid over your photo. Instead of placing your subject dead center, try positioning it on one of the lines or at an intersection point. This creates a more dynamic and interesting image.
- Camera Distance: This is a crucial tip for smartphone users. Cameras, especially phone cameras, struggle to focus on objects that are too close. Instead of moving the camera right up to the mini’s face, move it back a few inches. You can always crop the photo later. This ensures your entire miniature is in sharp focus.
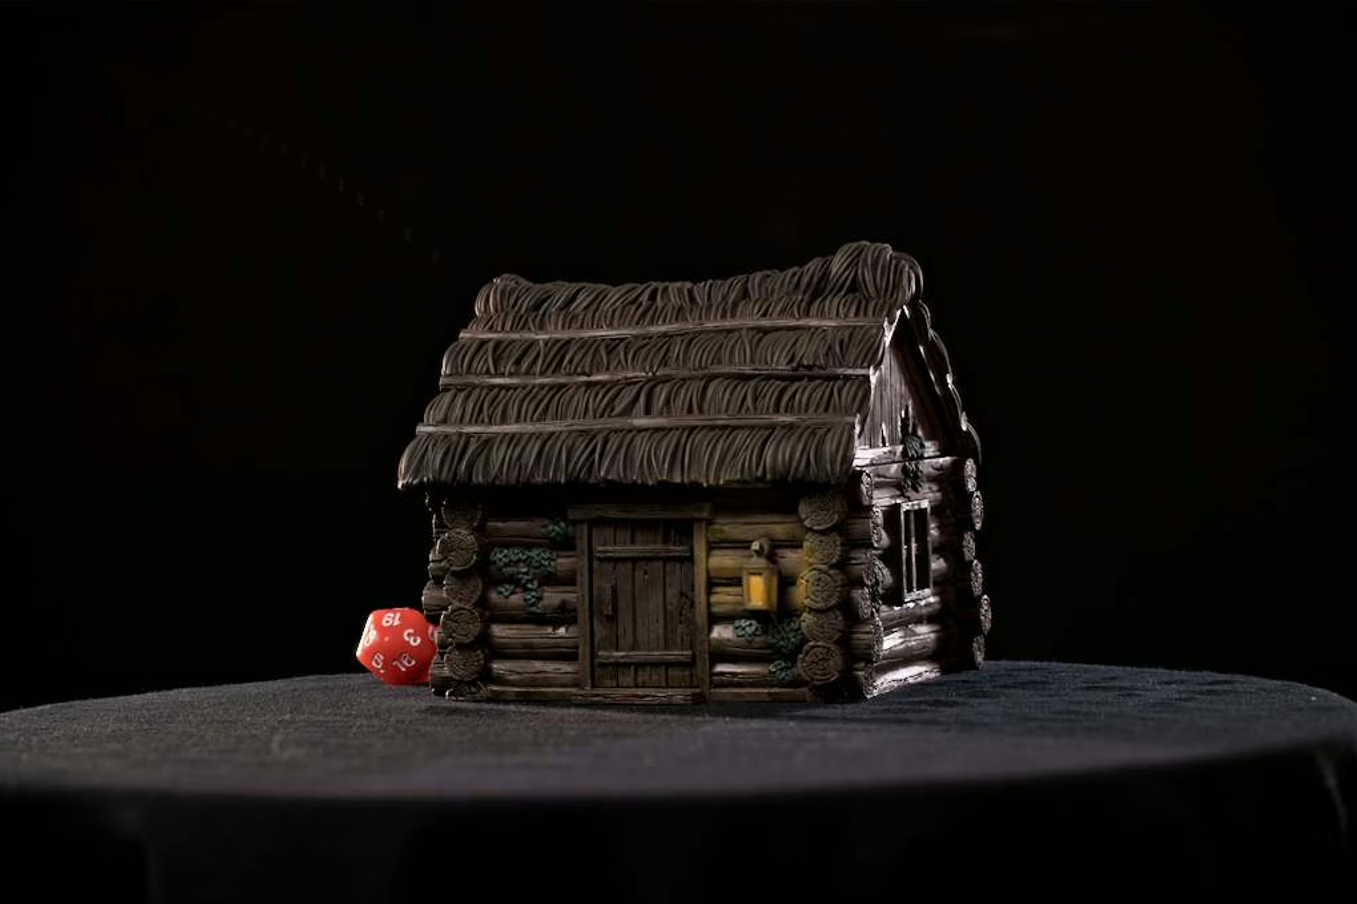
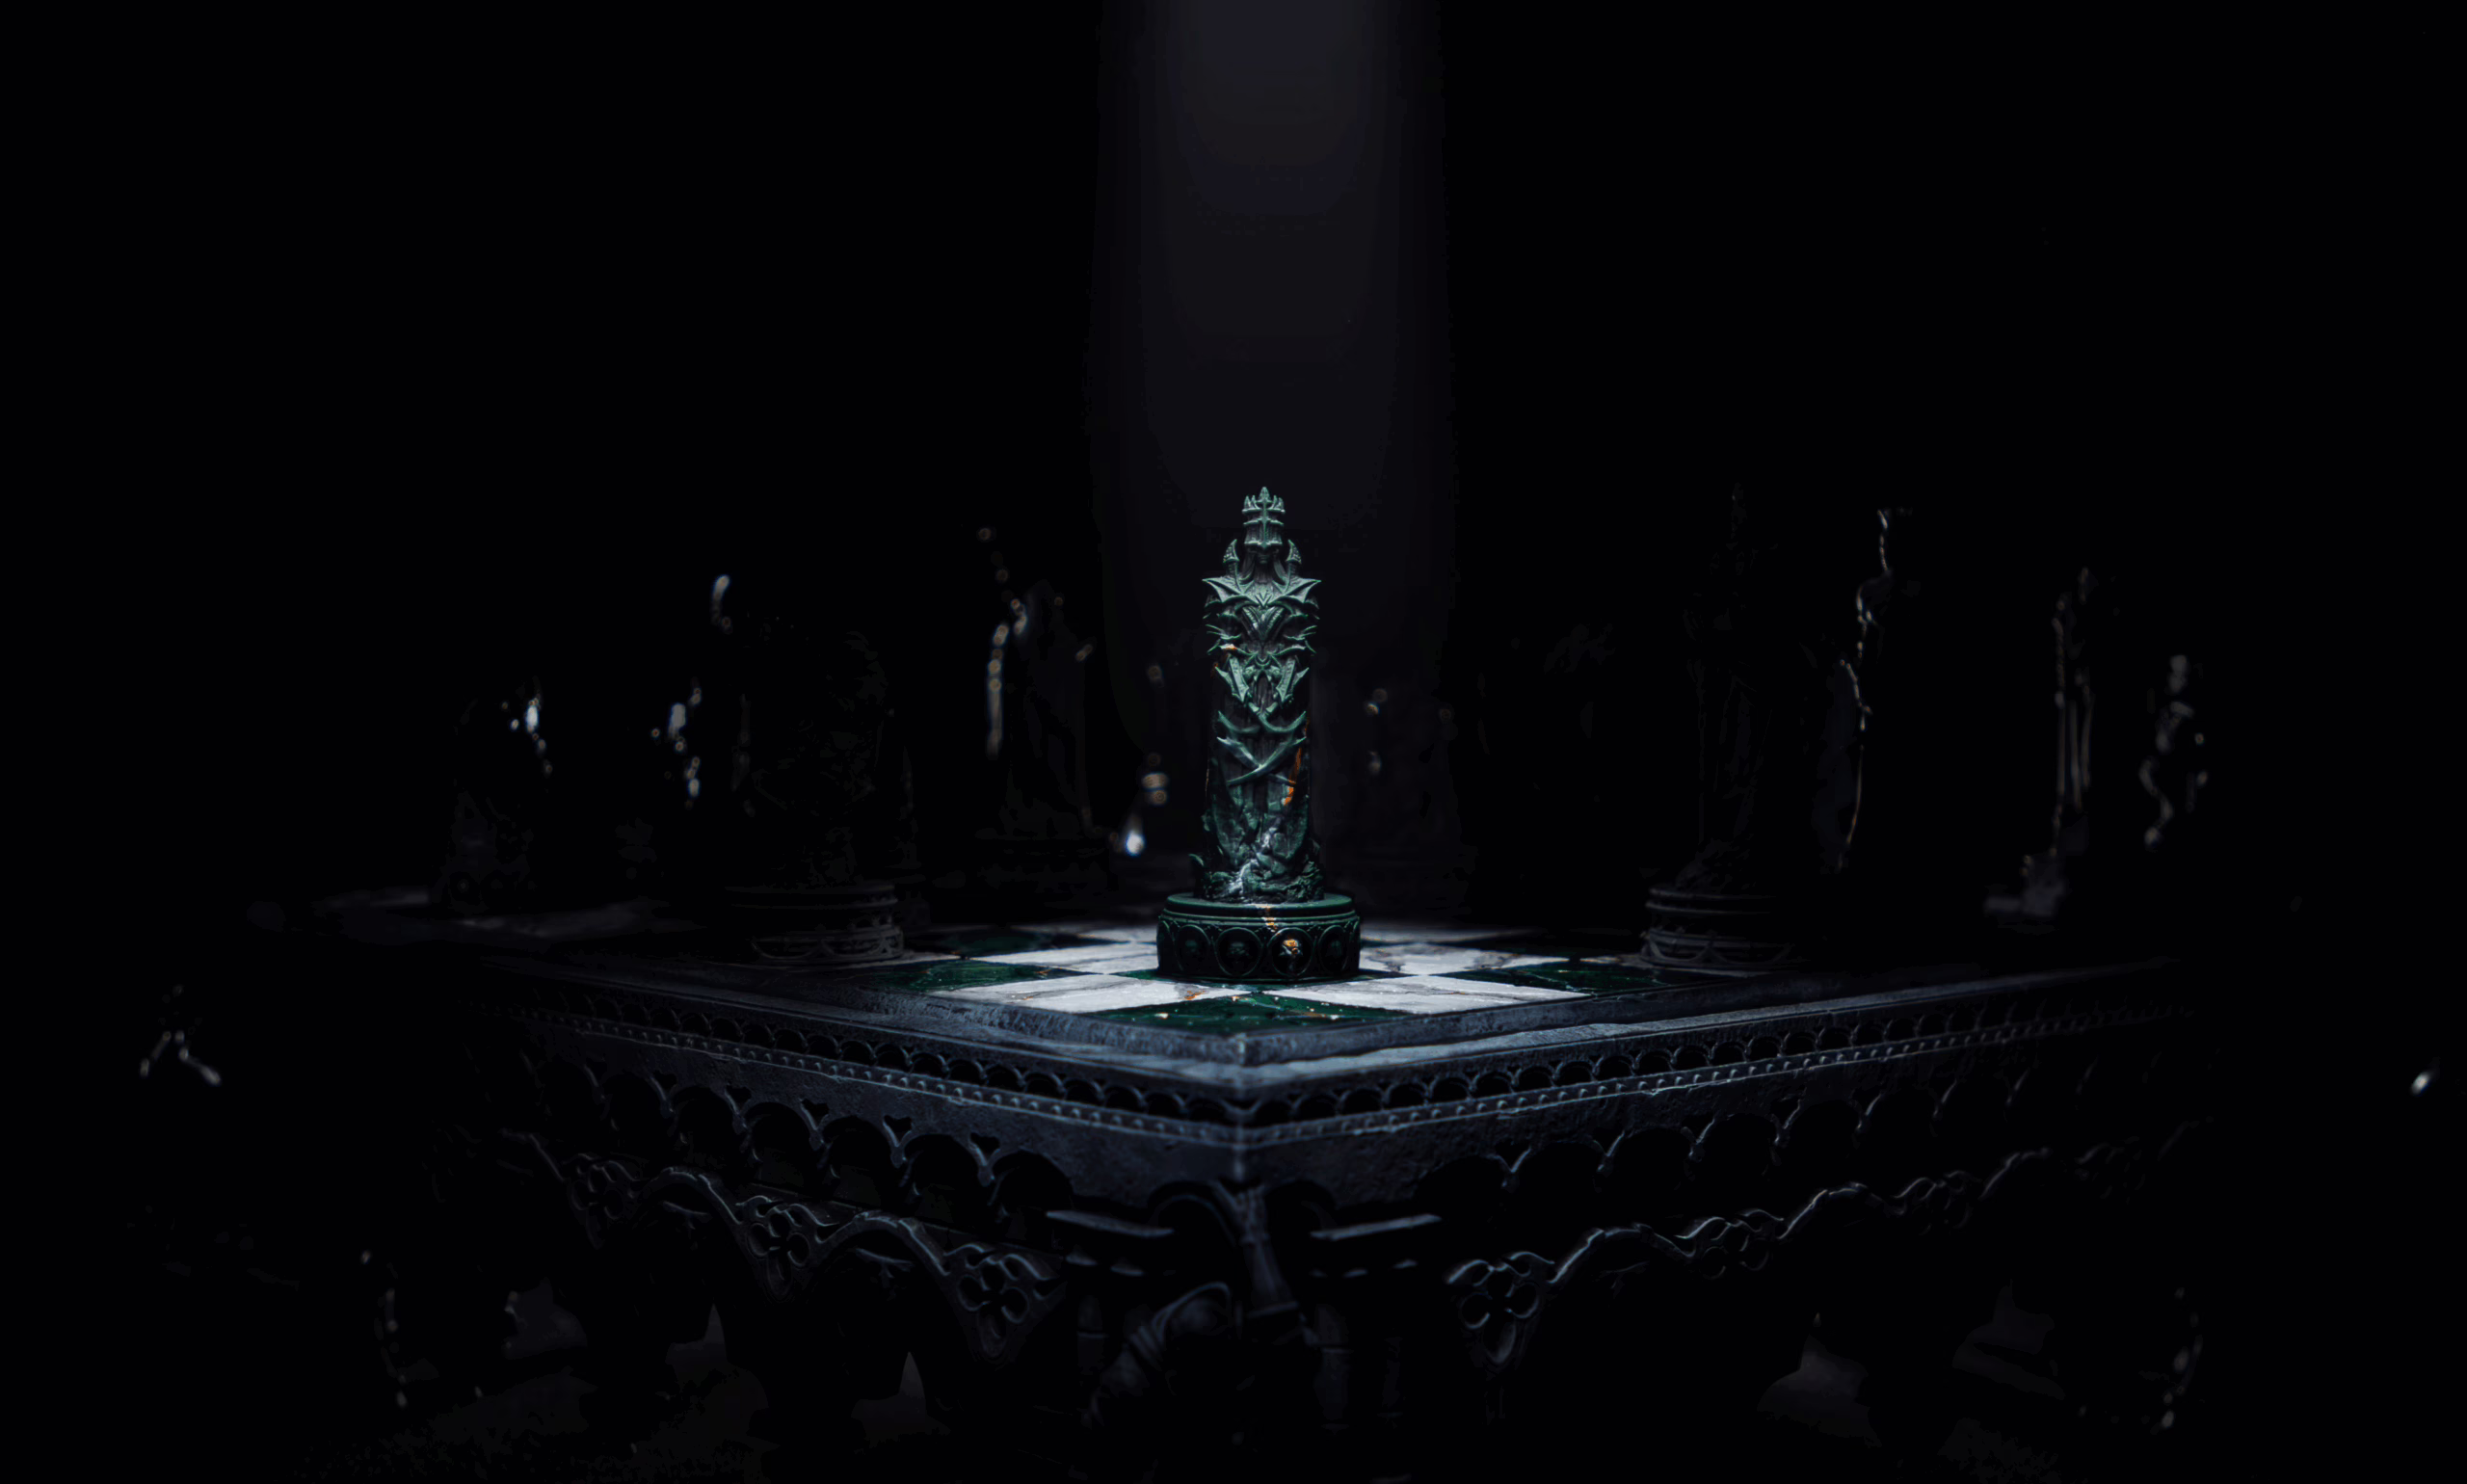
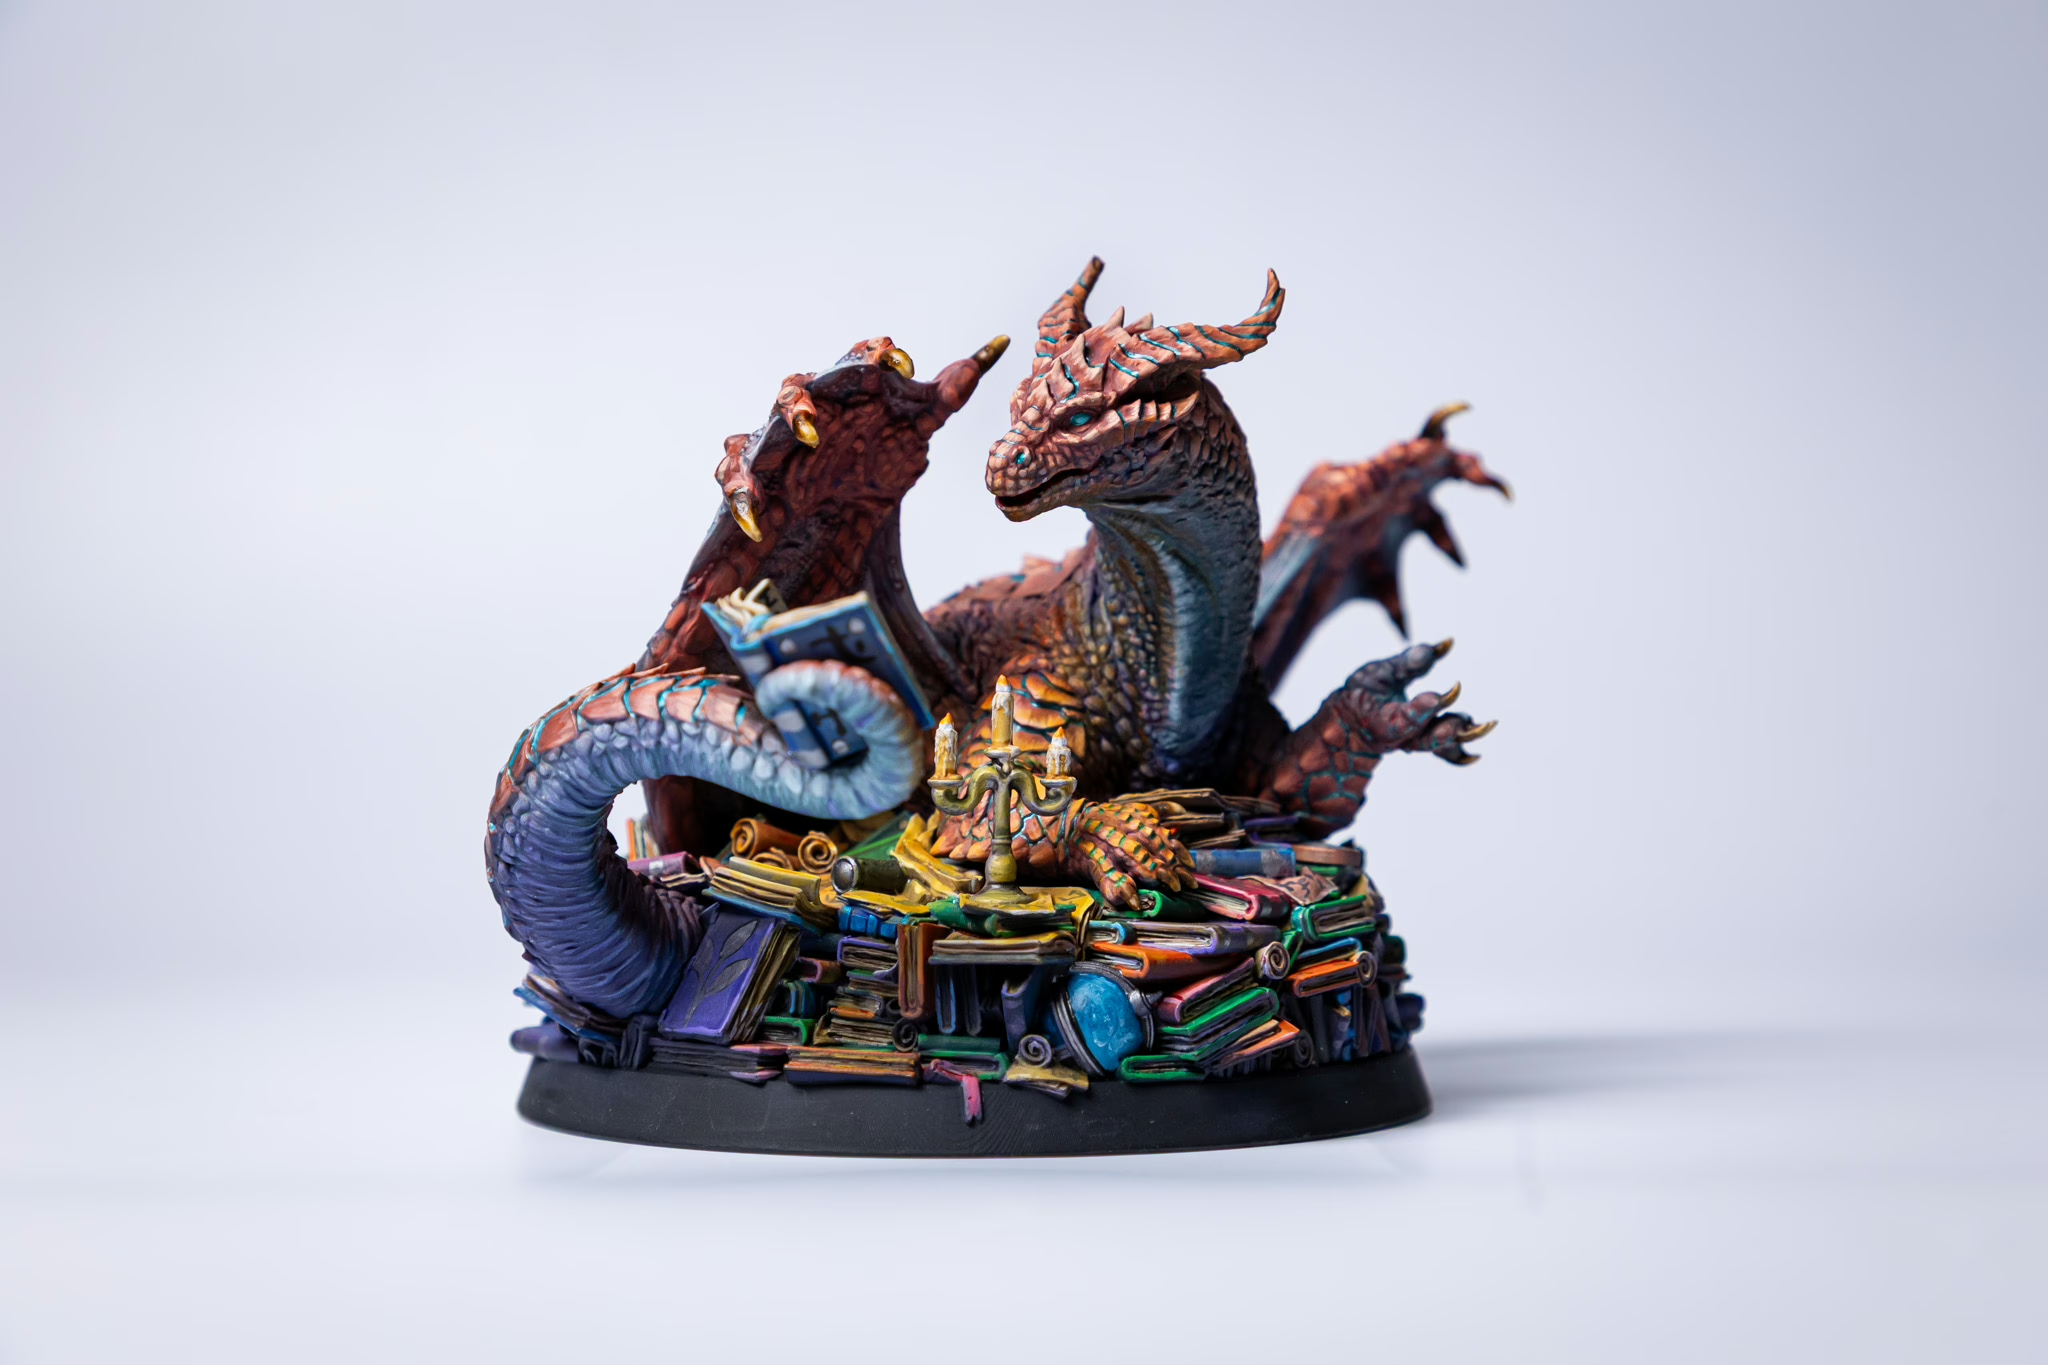
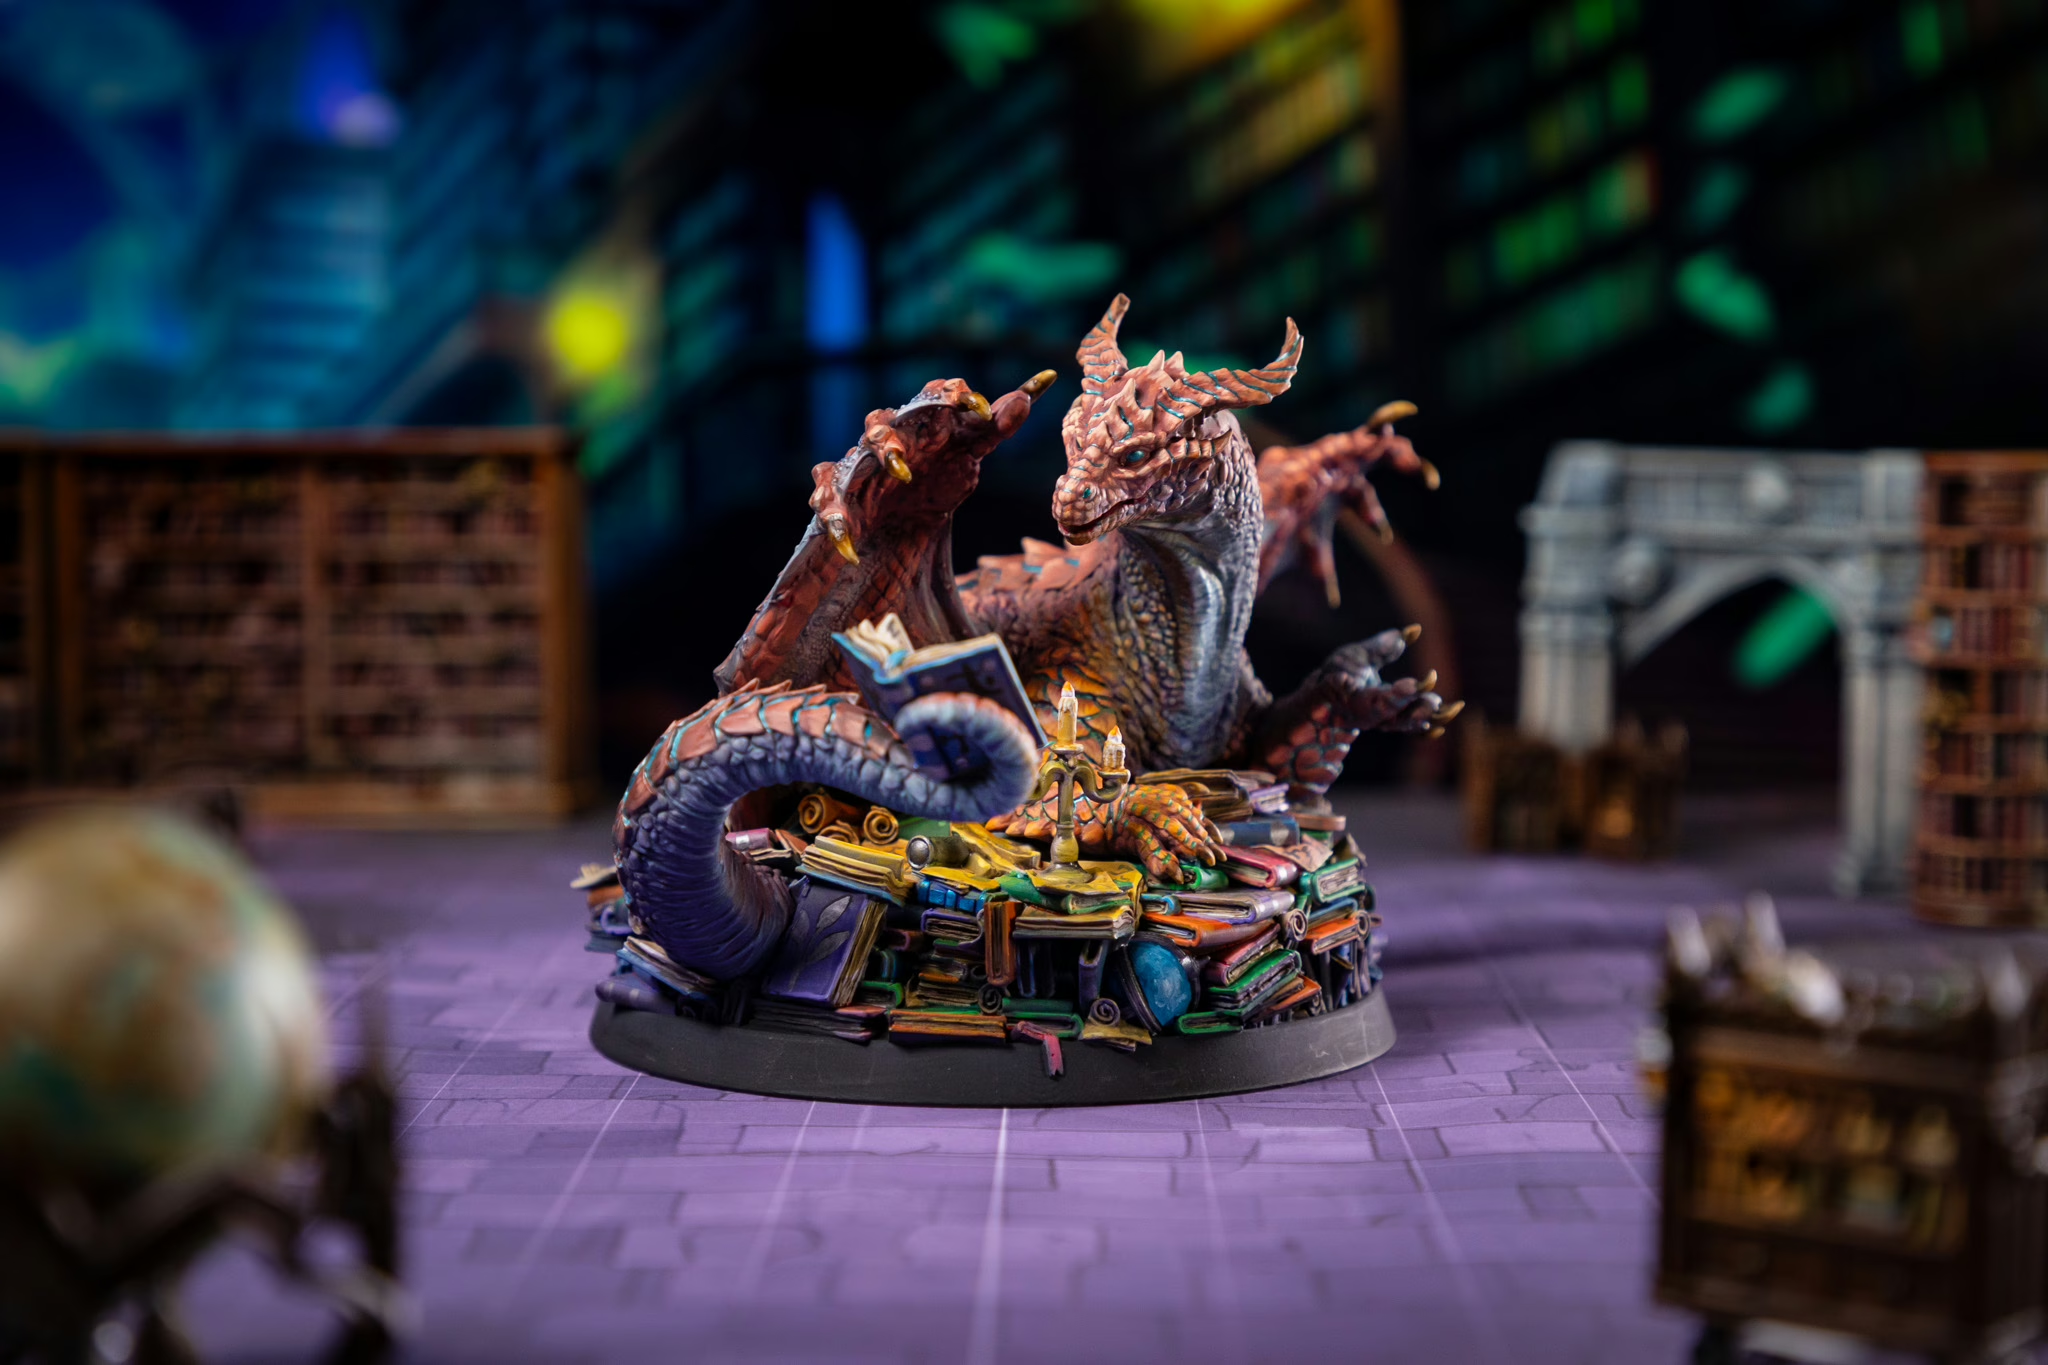
- Incorporate Terrain: Place your hero in front of a ruined wall or your monster lurking behind a rock. Using terrain as decoration adds scale and context, turning a simple photo into a storytelling moment. Speaking of which, if you’re looking for epic backdrops, you can find plenty of inspiration in our collection of 3D printable terrains. And for the ultimate subject, why not photograph a majestic dragon? Browse our list of the best Loot Studios dragons to fire up your collection for your next photoshoot star. I heard dragons are vain creatures; they’ll like the attention.
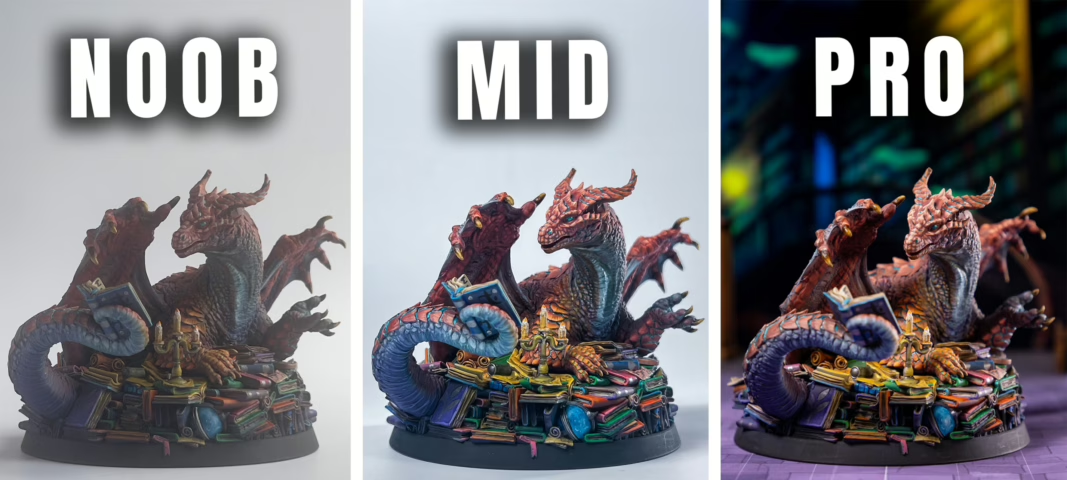
Editing Miniature Photos
Taking a great photo is step one. A little bit of editing is step two, and it’s where you can polish your work to a professional sheen. No, you don’t need Photoshop. Free apps on your phone are more than powerful enough.
Look for these basic tools:
- Crop: Use the rule of thirds to reframe your shot.
- Brightness/Exposure: Slightly adjust if your photo is a little too dark or too bright.
- Contrast: Adds depth by making the darks darker and the lights lighter. But don’t overuse it!
- Highlights/Shadows: These are your best friends. You can recover detail in a bright area by lowering the highlights or bring out detail in a shadow by lifting the shadows.
- Sharpen: A tiny amount of sharpening can make details pop. Too much will make your photo look grainy and artificial.
With just a minute of tweaking these settings, you can transform a good photo into a stunning portfolio piece.
Final Thoughts
As I said before, practice makes it permanent. You don’t need an expensive camera or a professional studio to take amazing photos of your painted miniatures. By focusing on the fundamentals—soft, controlled light, thoughtful composition, and simple editing—and practice, you can make your work shine. Besides, once you get the hang of it, you can test different features, lighting, and setups to elevate your miniature photography.
The journey from painting to presenting your art is incredibly rewarding. Start with a window and a piece of paper this weekend and see the difference for yourself. And when you’re ready for your next painting project, don’t forget to grab our free mini-pack to practice your new photography skills on.
Now, go grab your camera, and let’s create something legendary!
Loot Studios can help you paint highly detailed minis, statues, terrains and props. Choose your favorite bundle from our previous releases or sign up for Fantasy or Sci-Fi to receive a new bundle every month. You can also check out some tips on our YouTube Channel.

Luiza Romagnoli is an autistic Brazilian woman, journalist, and obsessed with RPG. She has been writing since she can remember, but it was in 2017, posting texts on Instagram, that she began to take it seriously. She has a poetry book published by Patuá Publishing House: sirva o chá. Nowadays, Luiza is a multi-hyphenned professional: she’s a writer, translator, English and Spanish Teacher, and has an RPG stationery store: Papelaria do Aurel. Although having all these jobs almost leave no room for her D&D sessions, she still loves them.